Связь android и web приложения посредством REST архитектуры. Часть 2 Интерфейс приложения
Для нашего приложения мы будем использовать уже всеми понравившийся стиль Material Design и постараемся сделать наше приложения немножко красивым и привлекательным.
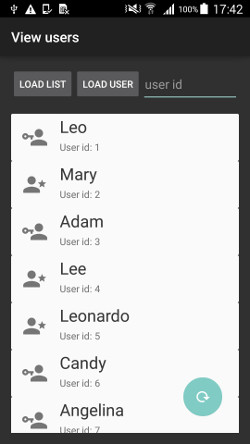
На картинке ниже показан вид приложения который получится у нас в финале

Создавать наше приложение мы буем в android studio. Открываем студию и создаем новое приложение.
Создаем новый файл colors.xml и дописываем туда строчки:
<?xml version="1.0" encoding="utf-8"?>
<resources>
<color name="secondary_text">#727272</color>
<color name="primary_text">#363636</color>
</resources>
Также добавляем строчки для ресурсов в файл strings.xml:
<resources>
<string name="app_name">View users</string>
<string name="hello_world">Hello world!</string>
<string name="action_settings">Settings</string>
<string name="button_load_list">Load list</string>
<string name="button_load_user">Load user</string>
<string name="hint_input_user_id">user id</string>
<string name="user_title_id">User id:</string>
<string name="user_title_age">User age:</string>
<string name="user_title_login">Login:</string>
<string name="user_title_info">Info:</string>
</resources>
и файл styles.xml
<resources>
<!-- Base application theme. -->
<style name="AppTheme" parent="Theme.AppCompat">
<!-- Customize your theme here. -->
</style>
</resources>
Теперь нам необходимо создать layout фалы для отображения наших данных. В нашем приложении мы будем использовать для примера FloatingActionButton, CoordinatorLayout, Snackbar и также CardView. И посмотрим как работать с ними.
Для того что бы мы могли спокойно использовать данные элементы нам необходимо добавить в файл build.gradle следующие строчки
dependencies {
   compile fileTree(dir: 'libs', include: ['*.jar'])
   compile 'com.android.support:appcompat-v7:22.2.0'
   compile 'com.android.support:design:22.2.0'
   compile 'com.android.support:cardview-v7:+'
}
Открываем activity_main.xml и пишем туда следущее:
<android.support.design.widget.CoordinatorLayout
    xmlns:android="http://schemas.android.com/apk/res/android"
    xmlns:tools="http://schemas.android.com/tools"
    xmlns:app="http://schemas.android.com/apk/res-auto"
    android:layout_width="match_parent"
    android:layout_height="match_parent"
    android:paddingLeft="@dimen/activity_horizontal_margin"
    android:paddingRight="@dimen/activity_horizontal_margin"
    android:paddingTop="@dimen/activity_vertical_margin"
    android:paddingBottom="@dimen/activity_vertical_margin"
    tools:context=".MainActivity"
    android:id="@+id/main_coordinator_layout"
    >
    <LinearLayout
        android:layout_width="fill_parent"
        android:layout_height="wrap_content"
        android:orientation="vertical"
        >
        <LinearLayout
            android:layout_width="fill_parent"
            android:layout_height="wrap_content"
            android:orientation="horizontal"
            >
            <Button
                android:layout_width="wrap_content"
                android:layout_height="wrap_content"
                android:id="@+id/button_load_list"
                android:text="@string/button_load_list"
                />
            <Button
                android:layout_width="wrap_content"
                android:layout_height="wrap_content"
                android:id="@+id/button_load_user"
                android:text="@string/button_load_user"
                />
            <EditText
                android:layout_width="fill_parent"
                android:layout_height="fill_parent"
                android:padding="5dp"
                android:inputType="number"
                android:hint="@string/hint_input_user_id"
                android:id="@+id/edittext_user_id"
                />
        </LinearLayout>
        <TextView
            android:layout_width="fill_parent"
            android:layout_height="wrap_content"
            android:id="@+id/title_caption"
            />
        <ScrollView
            android:layout_width="fill_parent"
            android:layout_height="fill_parent">
            <LinearLayout
                android:layout_width="fill_parent"
                android:layout_height="wrap_content"
                android:orientation="vertical"
                android:id="@+id/users_view_layout"
                >
            </LinearLayout>
        </ScrollView>
    </LinearLayout>
    <android.support.design.widget.FloatingActionButton
        android:id="@+id/fab"
        android:layout_width="wrap_content"
        android:layout_height="wrap_content"
        android:layout_marginBottom="24dp"
        android:layout_marginRight="24dp"
        android:src="@mipmap/ic_reload_white_36dp"
        app:fabSize="normal"
        app:layout_anchor="@id/main_coordinator_layout"
        app:layout_anchorGravity="bottom|right|end"/>
</android.support.design.widget.CoordinatorLayout>
B примере для наглядности мы используем иконки для кнопок и отображения информации о пользователе. Вы можете взять любые иконки которые вам нравятся, однако в сети есть неплохие ресурсы такие как этот где есть замечательные иконки выполнены в данном стиле.
Также нам необходимо создать еще 2 файла в котором будут хранится шаблоны для отображения информации.
И так первый файл это user_item.xml в котором хранится шаблон для отображения полной информации о пользователе.
<android.support.v7.widget.CardView
    xmlns:android="http://schemas.android.com/apk/res/android"
    android:layout_width="fill_parent"
    android:layout_height="wrap_content"
    android:padding="16dp"
    >
    <LinearLayout
        android:orientation="vertical"
        android:layout_width="fill_parent"
        android:layout_height="fill_parent"
        >
        <LinearLayout
            android:layout_width="fill_parent"
            android:layout_height="fill_parent"
            android:orientation="horizontal"
            >
            <ImageView
                android:layout_width="wrap_content"
                android:layout_height="wrap_content"
                android:id="@+id/user_icon"
                android:padding="16dp"
                android:src="@mipmap/ic_account_star_variant_grey600_36dp"
                />
            <LinearLayout
                android:layout_height="wrap_content"
                android:layout_width="fill_parent"
                android:orientation="vertical"
                >
                <TextView
                    android:layout_width="fill_parent"
                    android:layout_height="wrap_content"
                    android:id="@+id/user_text_name"
                    android:layout_margin="2dp"
                    android:textColor="@color/primary_text"
                    android:textSize="24sp"
                    />
                <LinearLayout
                    android:layout_width="wrap_content"
                    android:layout_height="wrap_content"
                    android:orientation="horizontal"
                    >
                    <TextView
                        android:layout_width="wrap_content"
                        android:layout_height="wrap_content"
                        android:text="@string/user_title_id"
                        android:textColor="@color/secondary_text"
                        android:layout_margin="2dp"
                        android:textSize="14sp"
                        />
                    <TextView
                        android:layout_width="wrap_content"
                        android:layout_height="wrap_content"
                        android:id="@+id/user_text_id"
                        android:textColor="@color/secondary_text"
                        android:layout_margin="2dp"
                        android:textSize="14sp"
                        />
                </LinearLayout>
            </LinearLayout>
        </LinearLayout>
        <LinearLayout
            android:layout_width="wrap_content"
            android:layout_height="wrap_content"
            android:orientation="horizontal"
            >
            <TextView
                android:layout_width="wrap_content"
                android:layout_height="wrap_content"
                android:text="@string/user_title_age"
                android:textColor="@color/secondary_text"
                android:layout_margin="2dp"
                android:textSize="14sp"
                />
            <TextView
                android:layout_width="wrap_content"
                android:layout_height="wrap_content"
                android:id="@+id/user_text_age"
                android:textColor="@color/secondary_text"
                android:layout_margin="2dp"
                android:textSize="14sp"
                />
        </LinearLayout>
        <LinearLayout
            android:layout_width="wrap_content"
            android:layout_height="wrap_content"
            android:orientation="horizontal"
            >
            <TextView
                android:layout_width="wrap_content"
                android:layout_height="wrap_content"
                android:text="@string/user_title_login"
                android:textColor="@color/secondary_text"
                android:layout_margin="2dp"
                android:textSize="14sp"
                />
            <TextView
                android:layout_width="wrap_content"
                android:layout_height="wrap_content"
                android:id="@+id/user_text_login"
                android:textColor="@color/secondary_text"
                android:layout_margin="2dp"
                android:textSize="14sp"
                />
        </LinearLayout>
        <LinearLayout
            android:layout_width="wrap_content"
            android:layout_height="wrap_content"
            android:orientation="horizontal"
            >
            <TextView
                android:layout_width="wrap_content"
                android:layout_height="wrap_content"
                android:text="@string/user_title_info"
                android:textColor="@color/secondary_text"
                android:layout_margin="2dp"
                android:textSize="14sp"
                />
            <TextView
                android:layout_width="wrap_content"
                android:layout_height="wrap_content"
                android:id="@+id/user_text_info"
                android:textColor="@color/secondary_text"
                android:layout_margin="2dp"
                android:textSize="14sp"
                />
        </LinearLayout>
    </LinearLayout>
</android.support.v7.widget.CardView>
и второй users_list_item.xml в котором хранится шаблон с краткой информацией о пользователе.
<android.support.v7.widget.CardView
    xmlns:android="http://schemas.android.com/apk/res/android"
    android:layout_width="fill_parent"
    android:layout_height="wrap_content"
    android:layout_margin="5dp"
    >
    <LinearLayout
        android:layout_width="fill_parent"
        android:layout_height="fill_parent"
        android:orientation="horizontal"
        >
        <ImageView
            android:layout_width="wrap_content"
            android:layout_height="wrap_content"
            android:id="@+id/user_icon"
            android:padding="16dp"
            android:src="@mipmap/ic_account_star_variant_grey600_36dp"
            />
        <LinearLayout
            android:layout_height="wrap_content"
            android:layout_width="fill_parent"
            android:orientation="vertical"
            >
            <TextView
                android:layout_width="fill_parent"
                android:layout_height="wrap_content"
                android:id="@+id/user_text_name"
                android:layout_margin="2dp"
                android:textColor="@color/primary_text"
                android:textSize="24sp"
                />
            <LinearLayout
                android:layout_width="wrap_content"
                android:layout_height="wrap_content"
                android:orientation="horizontal"
                >
                <TextView
                    android:layout_width="wrap_content"
                    android:layout_height="wrap_content"
                    android:text="@string/user_title_id"
                    android:textColor="@color/secondary_text"
                    android:layout_margin="2dp"
                    android:textSize="14sp"
                    />
                <TextView
                    android:layout_width="wrap_content"
                    android:layout_height="wrap_content"
                    android:id="@+id/user_text_id"
                    android:textColor="@color/secondary_text"
                    android:layout_margin="2dp"
                    android:textSize="14sp"
                    />
            </LinearLayout>
        </LinearLayout>
    </LinearLayout>

</android.support.v7.widget.CardView>
Теперь переходим в нашему MainActivity, хочу обратить внимание что данный класс должен наследоватся от AppCompatActivit.
public class MainActivity extends AppCompatActivity {
    private static String LOG_TAG = "USER_REST_APP";

    private Button loadUsers;
    private Button loadUsersById;
    private TextView userCaption;
    private EditText editTextUserId;
    private CoordinatorLayout mainLayout;
    private LinearLayout userListLayout;
    private FloatingActionButton fab;
   @Override
    protected void onCreate(Bundle savedInstanceState) {
        super.onCreate(savedInstanceState);
        setContentView(R.layout.activity_main);
        mainLayout = (CoordinatorLayout)findViewById(R.id.main_coordinator_layout);
        loadUsers = (Button)findViewById(R.id.button_load_list);
        loadUsersById = (Button)findViewById(R.id.button_load_user);
        userCaption = (TextView)findViewById(R.id.title_caption);
        editTextUserId = (EditText)findViewById(R.id.edittext_user_id);
        userListLayout = (LinearLayout)findViewById(R.id.users_view_layout);
        fab = (FloatingActionButton)findViewById(R.id.fab);
        fab.setOnClickListener(new View.OnClickListener() {
            @Override
            public void onClick(View v) {

            }
        });
        loadUsersById.setOnClickListener(new View.OnClickListener() {
            @Override
            public void onClick(View v) {

            }
        });
        loadUsers.setOnClickListener(new View.OnClickListener() {
            @Override
            public void onClick(View v) {

            }
        });
    }
}
На данный момент мы инициализировали наши компоненты а также поставили пустые обработчики события на наши кнопки.
Если мы запустим наше приложение, то мы увидим почти пустое приложения с несколькими кнопками. В следующей части мы уже напишем обработчики событий на эти кнопки, а также саму процедуру получения данных с сервра.

Комментарий (0)